

A System Built on Precision Great results require great preparation. You cannot simply spray sealer on a dirty or damp patio and expect it to last. At Chicagoland Paver Sealing, over 30 years we have developed a strict 7-step protocol to ensure the surface is perfectly prepped, the joints are stabilized, and the sealer bonds correctly for maximum durability.
Pro Tip
Spraying guarantees uniform coverage. We spray sealant to deeply penetrate chamfers and edges that rollers miss. Unlike rolling, which pulls up joint sand, spraying ensures a durable, even bond that wears better over time.
7 Steps to Perfection

Step 1:
Site Inspection & Protection Before a drop of water hits the ground, we inspect the project area. We identify drainage issues, loose/sunken/damaged pavers, or structural problems that need addressing. We also tape off sensitive areas and wet down surrounding vegetation to protect your landscape from cleaning solutions.
Step 2:
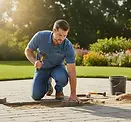
Repairs A sealed patio is only as good as its foundation. We address structural issues before cleaning. This includes leveling sunken areas (where water pools), re-setting loose border stones, and replacing cracked pavers to ensure a safe, even surface.

Step 3:
Mold & Mildew Treatment We apply a specialized pre-treatment to attack organic growth at the root. This is critical for areas with heavy shade or moss buildup. By chemically treating the mold and mildew first, we ensure that the spores are neutralized and won't immediately grow back under the new sealer.

Step 4:
Stain Removal General washing doesn't remove everything. We perform targeted spot treatments for stubborn organic & non-organic stains. Whether it's rust from patio furniture, oil spots on the driveway, or efflorescence (white salts), we use specific chemical solutions to lift these blemishes from the paver.

Step 5:
Deep Cleaning Once the stains are treated, we utilize commercial-grade rotary surface cleaners to deliver a uniform, high-flow, low pressure wash. This deep cleaning flushes out the old, contaminated joint sand and removes all dirt and debris from the surface texture without the "striping" caused by standard wand washing.

Step 6:
Polymeric Sand Installation After the surface is clean and dry, we install high-performance Polymeric Sand into the joints. We vibrate or sweep the sand deep into the crevices. Unlike regular sand, this contains binding agents that harden when activated, locking the pavers in place and preventing weeds and ant hills.

Step 7:
Spraying of Sealant The final touch. We apply your chosen sealant (Water-Based, Solvent-Based, Wet Look, Gloss, Natural) using professional, custom built spray equipment. In most situations, we will spray 3 coats of sealant. Spraying allows for a consistent coat that ensures all edges and chamfers are sealed, paver pores are saturated and the new polymeric sand is fully activated and stabilized.
-
Final Cleanup: The job site is cleaned to perfection and CAUTION tape is hung where needed.
-
The Wait: Typically, you can walk on the surface after 24 hours, and drive on it after 72 hours (weather permitting).
Because every project is unique, we offer tiered packages designed to scale with your needs. View the 2026 Pricing Guide.

Frequently Asked Questions About Our Process
-
Do I need to be home?
-
No, as long as we have access to an exterior water spigot and the driveway/patio is clear of furniture and vehicles, we can complete the work while you are away.
-
-
How long does this process take?
-
Most average residential projects are completed in 1–2 days (Day 1: Repairs, Treat & Clean / Day 2: Sand & Seal), depending on weather and drying time.
-
-
What about my patio furniture?
-
Please have all furniture, pots, and grills removed from the pavers prior to our arrival. If you need assistance with heavy items, please let us know during the estimate.
-
-
Why do you spray the sealant instead of rolling it?
-
Spraying (Step 7) ensures the sealer is applied to all of the surfaces of the paver (chamfers, edges, etc.) and not just the flat surface. It also guarantees that the sealant fully saturates the polymeric sand in the joints. Rolling often pulls the sand up and creates an uneven finish. This uneven finish will become very noticeable as the sealant wears over the years.
-
-
How long do I have to wait before I can use my driveway/patio?
-
Foot Traffic: You can typically walk on the surface 24 hours after the final coat is applied.
-
Vehicle Traffic: For driveways, we recommend keeping vehicles off for 72 hours to allow the sealer to fully cure and the sand to harden completely.
-
-
You can find more answers to your questions by visiting our FAQ Page.
Experience the Professional Difference
See why homeowners in Naperville, Hinsdale and across Chicagoland trust our process.